Paleo Key Lime Pie
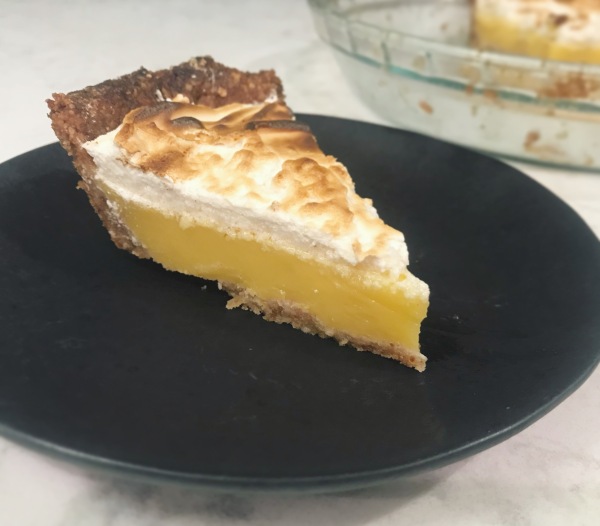
Macadamia and Almond crust
- 1 cup raw almonds
- 1 cup raw macadamia nuts
- 2 tbsp unsweetened coconut flakes
- 1/4 cup date paste (about 1/3 packed cup of whole pitted dates, run through the food processor first)
- 1/4 tsp pure vanilla extract
- 1/4 tsp sea salt
- Using a food processor, process the nuts and coconut to a coarse meal. Add the date paste, vanilla and salt and process until well combined.
- Press the dough evenly into a pie dish, working it up along the edges.
Key Lime Filling (from Paleo Running Mama)
- 2 large eggs + 1 egg yolk
- 1/3 cup + 2 tbsp key lime juice
- 1/4 cup + 2 tbsp honey
- 1/2 cup organic coconut cream
- 1 tbsp finely grated lime zest
- 2 tbsp tapioca flour
-
Preheat your oven to 350 degrees. In a large bowl, whisk together the eggs and yolk with the honey. Then whisk in the coconut cream, lime juice and zest, and tapioca and mix well until very smooth.
-
Pour the filling into the crust and bake in the preheated oven for 15 minutes. After 15 minutes, cover the top of the pie loosely with aluminum foil to prevent the crust from browning too much. Continue to bake another 10-15 minutes until just set (the center will still jiggle a bit) for a total of 25-30 minutes.
Coconut Meringue Topping (adapted from My Paleo Patisserie)
- 3 large egg whites, room temperature
- 3/4 cup honey (I used a bit less, maybe 1/2 cup)
- 1/4 teaspoon cream of tartar
- 1/4 tsp coconut extract
- Combine all the ingredients in a large heatproof bowl. Place the bowl over a small or medium-sized saucepan with 2 inches of simmering water in it. It’s important that the bottom of the bowl does not touch the water. Heat the mixture until it reaches 160°F (71°C) on a candy thermometer, whisking constantly so the eggs don’t curdle or seize.
- Remove from the heat and transfer the mixture to the bowl of a stand mixed fitted with a whisk attachment. Start whipping on low speed, gradually increasing to high over the course of 30 seconds. Continue to beat the mixture on high speed until stiff and completely cool. This could take up to 8 to 10 minutes.
- Spread over the top of the cooled pie, making sure to cover the entire surface. Use the back of a spoon to swirl and create peaks.
- Preheat your broiler. Place pie in the broiler for 30 seconds, watching carefully that it doesn’t over-brown.
- Remove from oven and let come to room temperature. Store in the refrigerator and serve cool.
Primal Char Siu (Chinese Roast Pork)


A few years back, I was on a carrot-ginger dressing kick. But with all my salad creations (just ask my hubby, I am our resident Salad Queen) I sometimes forget about this one, since its a recipe whose main ingredient isn’t a cupboard staple. However, I’m glad it popped back into my mind before a trip to Wegman’s last weekend, where I picked up a big ol’ bag of carrots, some ginger and most importantly, the rest of what would become a week’s worth of epic Asian-inspired salads. (Note: I paleo-ified the original dressing recipe by ditching the miso and adding a few drops of fish oil)
Anytime I mention to Scott that salad is on our menu, one of the first questions he asks is “What’s the protein?” So for last week’s cook-up I decided to whip up some delicious, sweet and savory Chinese Roast Pork, or Char Siu. You may recognize Char Siu as the not-so-naturally red sliced pork, with the lip-smackingly sweet glaze on it. However, those are obviously the two elements that had to go when it came to making this dish primal. The red dye is easy enough to omit, and for the glaze I used some raw honey. The end result was a pretty darn good take on the traditional version! It re-heated really nicely, and was the perfect topper to our salads (which also contained cucumber, cherry tomatoes, avocado, scallion, peppers, and sometimes Kimchi–Yeah we kinda spanned from Japan to China with a stop in Korea on this one).
Primal Char Siu (marinade recipe adapted from Delightful Tastebuds)
- 3-4 lbs boneless pork shoulder, sliced lengthwise into 3 inch strips
- 5 garlic cloves, run through a garlic press
- 2 star anise
- 1 TBSP Chinese five spice
- 3 TBSP raw honey
- 1 tsp white pepper
- 1 tsp cinnamon
- 1 tsp salt
- 1 tsp paprika
- 1/4 cup coconut aminos
- 1/4 cup raw honey (for the glaze)
Combine all the marinade ingredients (garlic through coconut aminos) together and pour into a large ziploc bag. Pierce each strip of pork shoulder a few times with a fork, and place into the bag, making sure to coat all the meat. Marinate in the refrigerator overnight.
When you’re ready to get cooking, heat your oven to 325° F. Cover a baking pan with aluminum foil and place a wire rack on top. Put the pork strips on top of the rack, and pour the remaining marinade into a small sauce pan. Roast the pork for 30 minutes, then flip the meat over and roast another 30 minutes, or until the internal temperature reaches 145° F.
While your pork is roasting, make the glaze. Add the 1/4 cup of raw honey to your reserved marinade and bring to a simmer. Let simmer for about 10 minutes, until it begins to reduce. Set aside.
When your pork reaches 145°, crank up the heat to 400° F. Brush half of the glaze generously over the meat and roast for 5 minutes. Then give it another brush with remaining glaze and roast another 5 minutes, or until nicely browned the way you like it.
Remove pork from the oven and let it rest for 10-15 minutes. Slice the strips into medallions and enjoy! If you aren’t making salads like we did, this would be delicious just served with some stir-fried bok choy, or on some cauliflower fried “rice!“
Strawberry Macarons, 2 Ways


A few weeks ago, I had a baking date with my friend Carissa to assist her in her foray into Macaron-making. This counts as my 4th attempt at this tricky little cookie, each to various degrees of success.
For this attempt, we started with the base recipe from I Love Macarons, which I attribute to my most successful outcome. We decided to make our shells strawberry flavored and a lovely shade of pink, and we each filled them with a different filling. I whipped up some delicious lemon curd infused with a little fresh thyme from my tiny garden, and Carissa filled her macarons with a rich dark chocolate ganache.
Despite this being my 4th go-around at macaron-making, this was such a learning experience! I don’t know if it was the nice weather, the fact that I had a co-baker with me, or just an uncharacteristic amount of patience I possessed that day, but as we baked each batch of shells, we really played around tweaking different elements to get just the right texture. Its actually pretty important to do this because of a few factors. First off, the climate does affect the way the shells bake, and they can be very sensitive to humidity. Secondly, everyone’s oven is going to vary slightly. Now, understandably if you do something during the macoronage stage that affects the texture of the shell, sometimes you’re just out of luck. Its a good rule of thumb to just remind yourself that its better to under-mix than to over-mix when folding your dry ingredients into the egg white mixture. However, not all hope is lost! Since you must bake your shells one tray at a time, you can do things like lower the temperature by 5 degrees but increase the cook time by a couple minutes. See how your next batch turns out, and adjust some more. We found this was they key to getting our macaron shells to go from browned but raw on the inside, to that perfect smooth and crisp shell with a chewy center!
While we baked we frequently referred back to this amazing troubleshooting guide from Food Nouveau that I highly recommend!!
Strawberry Macaron Shells
- 1 1/3 cup almond flour
- 3 cups powdered sugar
- 6 large egg whites, left out, uncovered overnight
- ½ Cup + 2 TBSP granulated sugar
- 1/2 tsp strawberry extract
- Pink gel food coloring
Stack two baking sheets on top of one another, and line the top one with parchment paper. Have a pastry bag with a plain tip (about 1/2-inch, 2 cm) ready. Using a pencil, draw 1-inch circles approximately 1-inch apart on your parchment paper. Or you can do as we did, and print out one of these handy templates from Food Nouveau! Just be sure to slide the templates out from under your parchment after you pipe your batter!
In a food processor, blend the almond flour and powdered sugar until well incorporated.
In a stainless-steel bowl of an electric mixer, beat eggs whites on high speed until they are foamy. Gradually add the granulated sugar, strawberry extract and your food coloring (just a little teeny bit at a time until you’ve reached the desired shade) to the egg whites and continue to beat until it forms a stiff meringue.
Using a rubber spatula, carefully fold the almond flour/powdered sugar mixture into the meringue in a couple additions. Blend by scopping batter up from the bottom and pressing it against the sides of the bowl. Do this a few times until well incorporated.
Fill pastry bag with the batter and carefully dispense into your drawn circles. Once the tray is filled, rap the baking sheet on the counter to help settle the batter. Top your shells with a sprinkle of dried thyme if you’re filling them with the lemon curd. Let tray sit out at room temperature for 15 minutes so that a slight crust forms on each shell.
Bake at 325 F for 10-13 minutes (yes, you will put the stacked trays in the oven together), until the shells are slightly crisp on top. They should not be browned. Allow to cool before removing from the trays. Repeat, one batch at a time until you’ve used up the batter. Again, refer to the troubleshooting guide if your first batch isn’t turning out properly – there may be something you can adjust!
Dark Chocolate Ganache (from Chow.com)
- 4 ounces bittersweet chocolate, finely chopped
- 1/2 cup heavy cream
- 2 tablespoons unsalted butter (1/4 stick), at room temperature and cut into cubes
Place the chopped chocolate in a large bowl. Warm the cream in a small saucepan over medium heat until it just starts to boil. Stir it into the chocolate without creating bubbles. Let sit for 1 minute. Add the butter and stir until smooth. Chill in the refrigerator until thickened but still spreadable, about 30 minutes.
Lemon Thyme Curd (from Epicurious)
- 4 large eggs
- 3 egg yolks
- ½ cup sugar
- 2 tablespoons lemon zest
- ½ cup fresh lemon juice
- ½ teaspoon chopped fresh thyme
- 1 vanilla bean, split
- 6 tablespoons cold butter, cut into pieces
- Pinch of salt
Pour water to depth of 1 inch into bottom of a double boiler over medium-high heat; bring to a boil. Reduce heat to medium-low, and simmer. Whisk eggs and egg yolks in top of double boiler off of heat; whisk in sugar and next 3 ingredients. Scrape out vanilla bean seeds into egg mixture, and whisk until blended. Place top of double boiler over simmering water. Cook, whisking constantly, 10 minutes or until mixture thickens.
Remove top of double boiler from simmering water, and add butter and salt, whisking until butter is melted. Strain through a fine-mesh sieve to achieve a smooth texture and remove the pieces of thyme. Place plastic wrap directly on warm curd (to prevent a film from forming), and chill 8 hours.
Assembly
Pair your cooled macaron shells into like sizes. Fill a piping bag fitted with a wide, round tip with the filling of your choice, or you can just spread your filling carefully using a dull knife or spoon. Carefully pipe/spread filling onto the flat side of one shell, leaving about 3mm space from the edges. Pick up your filled shell and its empty pair, and place them together, gently twisting as you press.
Store your macarons in the refrigerator. Enjoy!!
Birthday Blondies, with White Chocolate and Macadamia Nuts


Well, its been a crazy and incredible few weeks over here. Scott and I got married and spent an amazing week and a half in Maui; honeymooning, sunning ourselves, going on crazy roadtrips, and eating all the delicious treats the island had to offer! Explaining how amazing Maui is would require a very lengthy post, but I can say I highly recommend going. Its an absolutely incredible place to be, with so much to see and do, and a great overall vibe. Its not as bustling as Oahu, so if you want a more relaxed trip I’d point you straight in the direction of Maui! Below are a few shots with some highlights!
 Enjoying some frozen beverages at a Luau
 Kalua pig roasted in an Imu (an oven in the ground)
 Moco Loco! A local breakfast favorite consisting of rice topped with a burger patty, fried egg and gravy.
 A humpback whale waves “hello!”
 Fried Spam Musubi – yummier than it sounds!
 Snapping a few waterfalls along the Road to Hana
 An incredible drive along the south coast of Maui
So after all that excitement, we’re trying to readjust to normal daily life again, and to top it all off, this morning I officially turned 30. So of course, I had a sweet recipe up my sleeve just for the occasion.
While we were in Hawaii, one of my favorite things to enjoy were macadamia nuts. Seriously, they are in everything from tacos to ice cream, and I was in heaven. I’ve been on a mac nut kick for awhile now so I was prepared to hoard as many nuts home as I could! However, I shared said treats with my coworkers and have continued munching on them since getting back to the mainland, so I’ve already had to go out to Nuts To You and buy a whole new bag full! The reason being of course, that I knew this year’s birthday treat was going to star mac nuts.
These blondies are decadent! They’re moist, chewy, and super sweet, with an almost butterscotch flavor. They’re also really easy to whip up! I used a recipe from Emeril Lagasse and made just a few small tweaks. I ran out of vanilla extract so I decided to supplement with some hazelnut extract. A I knew I had to add some salt to the mix, because the original recipe didn’t include any, but I’m a huge fan of a little salty with my sweet. Other than that I stuck to the base recipe. However, this could be easily modified using other nut and chocolate combinations.
White Chocolate Macadamia Nut Blondies
- 2 sticks of butter
- 1 1/2 cups light brown sugar
- 2 eggs
- 1 tsp vanilla extract
- 1 tsp hazelnut extract
- 3 cups all-purpose flour
- 1 tsp salt
- 1 teaspoon baking powder
- 2 cups white chocolate chips
- 1 cup macadamia nuts, toasted and roughly chopped
Preheat the oven to 350 degrees F. Line a 9×13 inch baking pan with 2 pieces of criss-crossed aluminum foil and grease with butter.
In the bowl of an electric mixer, beat the butter and brown sugar on medium speed until fluffy. With the mixer running on slow, add the eggs and the extracts, mixing to combine.
In a separate bowl, combine the flour, baking powder, and salt. Then slowly add it into the wet ingredients, with the mixer on the lowest setting. Once incorporated, slowly add in the white chocolate and nuts a little at a time.
Spread the dough into the prepared baking dish, top with an extra sprinkle of salt if desired, and bake for 25-30 minutes, until the blondies are set in the middle. Once they’re cool enough, you can lift them out of the pan by holding the aluminum foil, but allow to cool completely before slicing.
Enjoy your treats— I know I have (for dinner last night, and breakfast this morning)!
Paleo Gingersnaps

Last month, I made these incredible Paleo Gingersnaps from a recipe on Primal Palate. But, due to being caught up with all sorts of fun and time-consuming wedding stuff in the past month or so (we are down to 18 days people!), I am just getting around to posting about it. My apologies on the delay, but these cookies are worth the wait!
I think these cookies are actually the most successful Paleo dessert I’ve made yet, in the sense that the taste and texture are 100% non-Paleo (crisp on the outside and perfectly caramelized/chewy on the inside). Believe me, I love all the treats I’ve concocted by using healthy substitutions, but I usually feel the need to preemptively alert the people I’m sharing with that they are Paleo, gluten-free, sugar-free, etc, just to adjust their expectations. These puppies are the real deal, and that can be a dangerous thing! Sure, they include “safe” ingredients, but realistically we cave-folk aren’t supposed to be giving in to our sweet tooth, regardless of whether we’re using evil white sugar or all natural raw honey. So, I challenge you to consume these spiced delights in moderation!
Paleo Gingersnaps (makes about 5 dozen cookies)
- 1/2 cup Molasses
- 1/4 cup Maple Syrup, Grade B
- 3 Tbsp Grass Fed Butter
- 1 Tbsp Coconut Milk
- 1/2 tsp Baking Soda
- 1/2 tsp Cinnamon, ground
- 1/2 tsp Cloves, ground
- 1/2 tsp Ginger, ground
- 1/2 tsp Nutmeg, ground
- 1/2 tsp Salt
- 3 cup Blanched Almond Flour
(Mostly) Paleo Dan Dan Noodles

If anyone else out there lives in Philly, you may have heard rave reviews of, or had the pleasure of enjoying, the Dan Dan Noodles at Han Dynasty. If you haven’t, I will try describing this dish to you, however my words will just not do it justice.
Dan Dan noodles are a Szechuan delight. A peanuty, porky, spicy bowl of awesome. The heat, made from two kinds of Szechuan peppercorn, is like nothing you’ve had before. The red peppercorn gives the dish a slight floral taste, with a more typical up front spice-factor. However, the green peppercorn creates less of an in-your-face, tear-inducing kick, and feels more like a diluted Novocain shot to the taste buds. So, once you take a pause from slurping down the delicious savory noodles, its as if your salivary glands have all sprung a leak. Its terrific and tingly, and you’ll want to keep going back for more.
Scott and I are, like many, huge fans of Han Dynasty. However, in keeping mostly Paleo, we reserve it for the rare occasion. So when we set out to create our own Dan Dan Noodles this weekend, we decided to make a few easy swaps to a great recipe from Lady and Pups, and make our noodles more diet-friendly. The result was great! One issue we ran into was that we couldn’t find the green Szechuan peppercorn, so we used regular green peppercorn instead. However, I will list the Szechuan variety in our recipe so that, should you have more luck than we did, you get the full effect of the spice. Another slight issue was the inclusion of douban chili bean paste; A paste made from broad beans, soy and chili, which is somewhat of a departure for us because we typically avoid soy and beans. However, with only a few tablespoons of the stuff and the fact that it is fermented (fermented legumes are a little more acceptable in the Paleo diet), we made an exception. You may be able to find a better brand of the stuff than we did, as I have read there are some varieties that don’t use soy at all.
Aside from the two small issues above, the “Paleoification” of this recipe was a breeze. We used yam noodles as a base (if you haven’t tried these, get on it! They can be found in the refrigerated produce section of the Asian supermarket), swapped almond butter for peanut, coconut aminos for soy sauce, and used light olive oil instead of vegetable oil.
Paleo Dan Dan Noodles (makes 2 servings)
For the chili oil:
- 1/2 cup of light olive oil
- 1 scallion, cut into segments
- 2 slices of ginger
- 2 garlic, smashed
- 2 star anise
- 1 small piece of cinnamon, approx 1″
- 3 tsp of sichuan green peppercorn, slightly crushed with mortar and pestle
- 1 tsp of sichuan red peppercorn, slightly crushed with mortar and pestle
- 2 1/2 tbsp of chili flakes
- 1/8 tsp of ground coriander
- 1/8 tsp of ground cumin
For the sauce:
- 1/2 lb of ground pork
- 1 tsp of coconut aminos
- 1 tsp of sesame oil
- 4 garlic
- 1 piece of ginger, approx 1 tbsp
- 3 tbsp of douban chili bean paste
- 3 1/2 tbsp almond butter
- 1/2 tsp of ground sichuan red peppercorn (grind it in a mortar and pestle, and then sift out the hulls with a fine mesh strainer)
- 2 tbsp of Shaoxing rice wine
- 1 1/2 cups low-sodium chicken stock
- 1/2 tsp of ground white pepper
- 1 package yam noodles
- sliced almonds and scallions as garnish
Make the chili oil (you can do this ahead of time). Combine olive oil, scallion, ginger, garlic, star anise, cinnamon, green peppercorn and red peppercorn in a small sauce pan. Set over medium heat and fry ingredients until the garlic and scallion are slightly browned. Add the chili flakes, ground coriander and cumin. Let simmer another minute, then turn off the heat and set it aside to allow the flavors to steep. The longer it sits, the spicier it’ll be!
You can also make the sauce paste ahead of time. In a food processor, combine the garlic, ginger, douban paste, almond butter, and ground peppercorn. Blend until it forms a smooth paste. Set aside.
Heat 1 tbsp olive oil in a stock pot or deep skillet over medium-high heat. Add the ground pork, coconut aminos and sesame oil, and cook until the meat has browned slightly. Add the sauce paste and cook, while stirring, until its fragrant and browned a bit more. Add the rice wine and chicken stock to deglaze the pan and let come to a simmer. Add the white pepper and cook 5 more minutes.
Rinse the yam noodles and divide into two bowls. Heat them up in the microwave for 2 minutes or so, then divide the sauce evenly over the noodles. Top with sliced almonds and scallions, and a drizzle or two of the chili oil to taste. I also served mine with sautéed bok choy just to add some extra veg!
Enjoy!
Homemade Almond Milk

Hey folks! My sincere apologies for the long hiatus. I hope everyone had a wonderful holiday season and sparkly New Years, and that you are, like me, maybe finally getting back into the normal(ish) swing of things!
Kicking off the new year, the clock has been ticking away as my March wedding fast approaches! Naturally, that means I’ve been trying my darndest to make smart food choices and stay true to a mostly Paleo way of life. This means, while I have made allowances for occasions like my bachelorette party and Scott’s birthday, on a regular daily basis, I’m grain, legume, sugar, and dairy-free. Even last year both Scott and I leaned more “Lacto-Paleo,” but I find I feel my best when I stay away from the stuff all together. That means no cheese on my salads, no cream in my coffee. And I’m really okay with it!
So speaking of dairy, one thing I tried this year with much success, was making my own almond milk. While I used to keep the stuff around as a staple for daily smoothies, I’ve switched to mostly eating eggs and fresh juice in the morning. However, I still enjoy a smoothie or two on the weekends as a pre-workout boost. Since I don’t go through a carton as fast as I used to, making my own unsweetened almond milk was great, because I wasn’t left with a lot sitting in the fridge for weeks on end. Its also nice knowing that after such a simple process, theres such a great reward in the form of healthy and additive-free milk. All you need are almonds, water, and either a juicer or a food processor and cheesecloth!
Homemade Almond Milk (makes about 1 quart)
- 2 Cups whole, raw almonds
- water
- juicer or food processor
- cheesecloth or nut milk bag (if using food processor)
- 1 tsp vanilla extract
- Soak the almonds overnight in about 6 cups of water. This is called “sprouting” the nuts. Sprouting nuts helps remove the enzyme inhibitors, activating and multiplying more of their nutrients!
- Rinse the almonds until the water runs clear.
- Add rinsed almonds to a bowl and add 6 cups of water (if you want to make different amounts or different types of nut milk, the key is always use a 1 to 3 ratio of nuts to water).
- If using a juicer, just begin spooning the nuts and water through your juicer and watch the magic happen! If using a food processor, blend the nuts and water until the nuts are finely ground and the water has turned a milky color.
- If you used a food processor, transfer the mixture into your nut milk bag or cheesecloth that’s been folded over 3-4 times. Strain all the milk out of the nut mixture. Whichever process you’re using, you can keep your almond pulp! Either mix it with a few other ingredients like date paste, coconut, vanilla and other spices and make some raw cookies, or dry it in the oven at 200 degrees to make yourself some almond flour!
- If you’d like, add a teaspoon of vanilla to flavor your milk.
Your fresh almond milk will keep in the refrigerator in a mason jar for about 1 week. Enjoy!
Pumpkin Spice Caramels

And so, the pumpkin/pumpkin spice craze continues… this time in the form of delicious and chewy caramels.
Last weekend I had a long-standing kitchen date/caramel-making lesson with my friend, Carissa. I’m always happy to forgo my diet in the name of helping others! After we finished our first batch of basic salted caramels, which I was impressed only took us one try (I suppose at this point I’m a little more seasoned in the dangerous art of caramel), we decided to make a second batch with a seasonal spin. So Carissa whipped up some homemade pumpkin spice (I’d recently run out-big surprise), and we added it to our base recipe. What I love about caramel-making is once you master the basics, its so easy to customize the flavor, especially since the ingredient list is minimal and the process is rather quick, you can easily whip up multiple batches in one afternoon.
The caramel recipe we followed comes from The Kitchn, and I highly recommend heading over there to read their long and informative post before diving into the recipe. Caramel-making may seem simple but it really is a science, and there are little things you need to pay attention to yield the results you’re after. One thing that perplexed us after our caramels were cooled and ready to cut and wrap, was that while our salted caramels turned out lighter in color, they were firmer; and even though we cooked our spiced caramels a tad longer to achieve a dark amber color, they were much softer. Some of the sweet mysteries of caramel-making are still lost on me, but I just chalk them up to delicious happenstance!
Homemade Pumpkin Spice
- 4 TBSP cinnamon
- 4 tsp nutmeg
- 4 tsp ginger
- 3 tsp allspice
Pumpkin Spice Caramels
From The Kitchn. Makes about 55 caramels.
Ingredients
- 1 cup heavy cream
- 4 tablespoons unsalted butter
- 1/4 teaspoon salt
- 1 1/2 cup white granulated sugar
- 1/4 cup corn syrup
- 1/4 cup water
- 1/2 teaspoon vanilla extract
- 1 1/2 teaspoon of pumpkin spice
Equipment
- 8×8 baking dish (or similar size)
- Parchment paper
- 2-quart saucepan
- 4-quart saucepan
- Instant-read thermometer or candy thermometer
- Spatula
- Whisk
- Wax paper
Instructions
1. Prepare the caramel mold. Line an 8×8 baking dish with parchment so that excess paper hangs over the edges. Spray the parchment and the sides of the pan with nonstick spray.
2. Melt the butter in the cream. Over medium heat, warm the cream, butter, and salt in the 2-quart saucepan until the butter melts. Remove from heat, but keep the pan close by.
3. Combine the sugar, corn syrup, and water. In the larger 4-quart saucepan, combine the sugar, corn syrup, and water. Stir until the sugar is evenly moistened and you form a thick grainy paste. Wipe down the sides of the pan with a damp pastry brush so there are no sugar crystals above the surface of the sugar mixture. Clip the instant-read thermometer to the side of the pan so that the heat sensor is immersed in the sugar. Do not stir the sugar after this point.
Note: The large saucepan is necessary because the sugar will bubble up and triple in size when you add the cream. Do not substitute a smaller pan.
4. Cook the sugar syrup. Place the pot with the sugar mixture over medium to medium-high heat. Let the sugar syrup come to a boil without stirring. At first, you will see small bubbles around the edge of the pan, which will eventually move inward. Around 250°F, the sugar syrup will turn transparent and boil rapidly. Around 320°F, the syrup will darken slightly and smell caramel-like. You can proceed to the next step any time after the syrup reaches 250°F and before it reaches 325°F.
Note: If your instant-read thermometer isn’t quite submerged into the sugar, you may need to tilt the pan to get an accurate reading. Simply tilt the pan by the handle until the thermometer is submerged a few inches in the sugar syrup. If the syrup hasn’t reached 250°, wipe down the sides with a pastry brush again. If it has, there’s no need.
5. Whisk in the cream and butter. Turn off the heat under the sugar syrup. Slowly pour the warm cream and butter mixture into the sugar syrup while whisking the sugar syrup gently. The sugar syrup will bubble up and triple in size. Stop whisking once all the milk and butter mixture has been added.
6. Heat the caramel to 245°F – 250°F. Return the pan to medium to medium-high heat. Let the caramel come to a boil without stirring. It will start off as a soft buttery yellow and eventually darken to reddish-brown caramel. Remove from heat when the caramel reaches 245°F to 250°F.
7. Whisk in the vanilla and pumpkin spice.
8. Pour the caramels into the mold. Immediately pour the caramels into the mold. Do not scrape the pan (there are sometimes hard burnt bits on the bottom). Knock the pan agains the counter a few times to help air bubbles work their way out.
9. Let the caramels set. Set the caramels somewhere out of the way to set, for at least two hours or (ideally) overnight. Once the caramels have cooled to room temperature, you can cover the pan.
10. Cut the caramels. When the caramels have set, lift them out of the pan by the parchment paper flaps and onto a cutting board. Cut the caramels into candies with a very sharp knife. If the caramels stick to your knife, spray your knife with nonstick cooking spray.
11. Wrap the caramels in wax paper. Cut squares of wax paper a little longer than your caramels. Wrap each caramel in wax paper and twist the ends closed. Caramels will keep at room temperature for about two weeks.


Since you can probably tell I’ve been pretty good at sticking closely to the Paleo lifestyle lately, this post may come as a shock; not unlike the insulin shock these sugar-bombs had on my system at 11pm last night, keeping me up past my early-workout bedtime! However, this weekend is my ultimate best bud / step-sister, Ashley’s birthday, and birthdays always call for indulgent treats!
These rich and sinful delights come from the awesome cookbook, Baked Explorations, but I decided to make cupcakes instead of the beautiful 3-tiered creation in the book so that Ashley could more easily share these at work. The result is a not-too-sweet, rich but delicate chocolate cake, topped with an oh-so-fluffy coffee buttercream (made with a technique I’d never heard of before, but will gladly try again!). I opted to dip the cupcakes in the ganache before frosting them which is not only easier, but it looks great and ended up hiding any imperfections in the cupcakes due to some of them rising over the edges of the pan and breaking apart a bit (lesson learned: don’t try to make a perfect 3 dozen if it means you’re putting too much batter in each one! No harm in making an extra few!)
So, enjoy the chocolatey goodness, and most importantly HAPPY BIRTHDAY TO ASHLEY!
Chocolate & Coffee Cupcakes with Dark Chocolate Ganache
adapted from Baked Explorations by Matt Lewis and Renato Poliafito. Makes 3 dozen.
- 3/4 cups dark unsweetened cocoa powder
- 2/3 cup sour cream
- 2-2/3 cups all-purpose flour
- 2 teaspoons baking powder
- 1 teaspoon baking soda
- 1/2 teaspoon salt
- 3/4 cups (1-1/2 sticks) unsalted butter, cut into 1″ cubes, softened
- 1/2 cup vegetable shortening
- 1-1/2 cups granulated sugar
- 1 cup firmly packed dark brown sugar
- 3 large eggs, at room temperature
- 1 tablespoon pure vanilla extract
- 1-1/2 cups granulated sugar
- 1/3 cup all-purpose flour
- 1-1/2 cups whole milk
- 1/3 cup heavy cream
- 1-1/2 cups (3 sticks) unsalted butter, soft but cool, cut into small pieces
- 1 teaspoon pure vanilla extract
- 3 tablespoons coffee extract
- 8 oz. good-quality (60-72%) dark chocolate, coarsely chopped
- 3/4 cup (1-1/2 sticks) unsalted butter, softened and cut into 1/2″ pieces
- 1 tablespoon light corn syrup
- 3 dozen chocolate covered espresso beans
Make the cupcakes
Make the Coffee Buttercream
Make the Chocolate Glaze
Assembly
Primal Pumpkin Chocolate Chip Cookies


On my last trip to Wegman’s, the grocery-shopping-nerd’s dream store, I picked up some organic pumpkin purée “just in case I felt inspired.” And now that it officially feels like Autumn, I feel I’m ready to dive into the pumpkin craze that takes hold around this time each year.
Starting out with a little sweet treat, I whipped up some amazingly addictive pumpkin cookies on Friday night. That was 3 days ago. None remain.
Yes, these cookies are, for the most part, paleo (considering we’re not technically supposed to find loopholes that allow us to eat dessert). They’re grain-free and sweetened with a bit of pure maple syrup and a mashed banana. I even found some Lily’s stevia-sweetened chocolate chips at Whole Foods! While I was originally going to get the Enjoy Life Chocolate Chips that I keep seeing in paleo/primal recipes, I passed on them because although they’re dairy and soy-free, they still use cane sugar. Right now I’m not as much concerned with little bits of soy as I am with sugar, so stevia sealed the deal. And these chips are good! You really can’t tell they’re not the good ol’ Tollhouse variety.
I based the recipe off of one from Multiply Delicious, only changing it slightly by swapping some of the coconut oil for real butter. What can I say? If I’m going to forego grains and sugar, hell, I’m still using butter!
Primal Pumpkin Chocolate Chip Cookies
- 2 cups blanched almond flour
- 1/2 teaspoon salt
- 1/2 teaspoon baking soda
- 1 tablespoon pumpkin pie spice
- 1/2 cup pure pumpkin puree
- 1 small ripe banana, mashed
- 1/4 cup maple syrup
- 1 tablespoon vanilla extract
- 3 TBSP coconut oil
- 2 TBSP butter
- 1/2 cup Lily’s Chocolate Chips
Preheat oven to 350 and line 2 baking sheets with parchment paper.
In a small microwaveable bowl, melt the coconut oil and butter. Set aside.
In a large bowl whisk together the almond flour, baking soda, salt, and pumpkin pie spice. In another bowl, mix together pumpkin puree, mashed banana, maple syrup, and vanilla extract.
Mix wet ingredients into dry ingredients and stir until combine. Then add melted coconut oil and butter, and stir to incorporate. Mix in the chocolate chips.
Drop 2-TBSP mounds of dough onto the prepared baking sheets. Use the back of the spoon to slightly spread the cookies out. Sprinkle the tops of the cookies with a little extra salt (optional). Bake cookies for 25 to 30 minutes until golden. Let them cool for 5-10 minutes to set, then enjoy!
These cookies keep very well in an airtight container in the fridge. They stay nice and chewy!

